Montjuic Magic!

  • Run type: hilly, paved loop
  • Location: Montjuic, southwest Barcelona
  • Distance: medium (5.5 miles / 9km approx)
  • Starting point: Parc de Bombers de Montjuïc (Montjuic Fire Station)


DSC_0210
Castell de Montjuic sits on top of the 180m high Montjuic hill

We’re back with the third instalment of Run Barca’s guide to the best running routes in Barcelona. First up, we hit the beach. Next we took a trip up to Gaudi’s Park Güell.

This time, we’ll be taking in the spectacular views of Barcelona’s thriving port from atop of Montjuic. As well as climbing nearly 180 metres on the way to the summit, we’ll be running around the walls of an 18th Century castle, past a restored Art Deco hotel, and skirting past Barcelona’s Olympic Stadium as we wind our way up (and then back down) though Montjuic’s wooded hillsides.

This run might well be our favourite route in all of Barcelona, but one thing it’s not is easy. The course elevation starts off at close to sea level but by the time you reach Castell de Montjuic at the top of the hill, you’ll have hit the 600ft (180m) mark after 3.5km (2.2 miles) of pretty relentless climbing. But as every runner will tell you, the most challenging runs are often the most rewarding and this particular route is no exception. We’re sure you’ll come to love it just as much as us!

Montjuic Loop
Montjuic Route Map

Montjuic

Montjuic is said to mean, literally, “Jewish Mountain” – and indeed the remains of a medieval Hebrew cemetery have been found on the hill – although others suggest that its name derives from the Latin mons jovicus meaning “Hill of Jove”. Either way, there’s plenty of history in this here hill. Located to the southwest of Barcelona, Montjuic enjoys commanding views of both the harbour and city, and for that reason it has been a strategically important site for centuries.

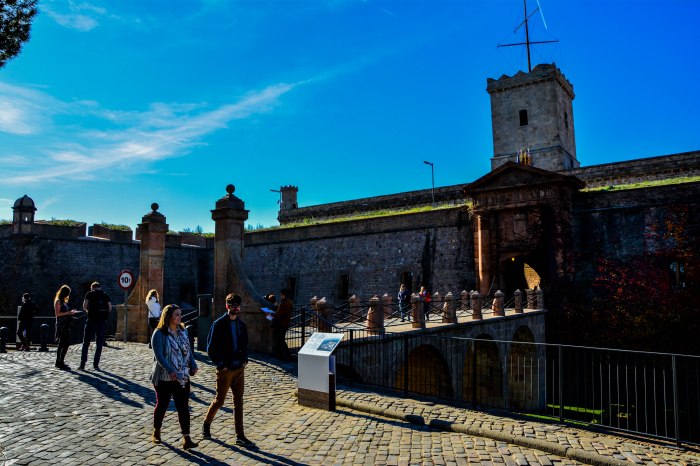
While the current fort – Castell de Montjuic – which sits at the hill’s peak was built in the late 18th Century, a number of earlier fortified settlements pre-date it. Captured by the British during the Spanish War of Succession in 1705 and by the French during the Napoleonic Wars, the castle was held by both the Republicans and Nationalists during the ebb and flow of the Spanish Civil War and was the site of Catalan nationalist leader Lluís Companys’ execution in 1940 on General Franco’s orders.

Today you can visit the castle for €5 and enjoy 360º views of Barcelona from the viewing platform inside the grounds.

DSC_0233
Almost there…! Runners approaching Castell de Montjuic

But enough history… Let’s get on with this run.

The Route

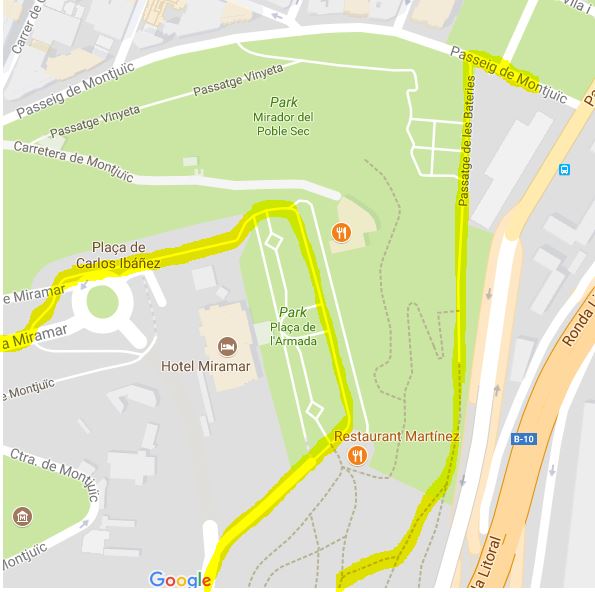
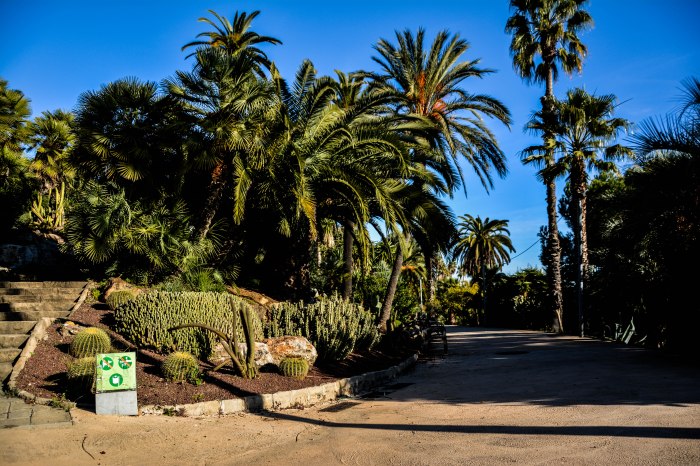
Our starting point for this run is the Fire Station at the bottom of Montjuic’s eastern side, nearest the harbour, just a short hop along from the Maritime Museum and the Columbus Monument. Turning off of Passeig de Montjuic, you’re going to take a left up the pedestrianised Passatges de les Bateries, whose name pays homage to the many gun emplacements littering the hillside. From the get go, you’ll be running up hill, albeit only gently at this stage, and before long the pedestrianised road turns to a set of gravelled paths through the charming Jardines de Mossen Costa i Llobera – a landscaped garden specialising in cacti of all shapes and sizes. Luckily, the neatly kept walkways are wide enough not to run the risk of running into something sharp and prickly so fear not…


Montjuic Start
Turn left up the hill and head into the Jardines de Mossen Costa i Llobera

Keep running up hill and bear right (avoid going up any steps, however, as there are step-free routes through the park) until you hit the exit at the garden’s southwest side where you’ll meet a road named the Carretera de Miramar, one of the main routes by car up Montjuic. Here you’ll turn back upon yourself to your right, continuing to run up hill on the pavement at the side of the road.

DSC_0105
Prickly Feat: Large collections of cacti at the Jardines de Mossen Costa i Llobera

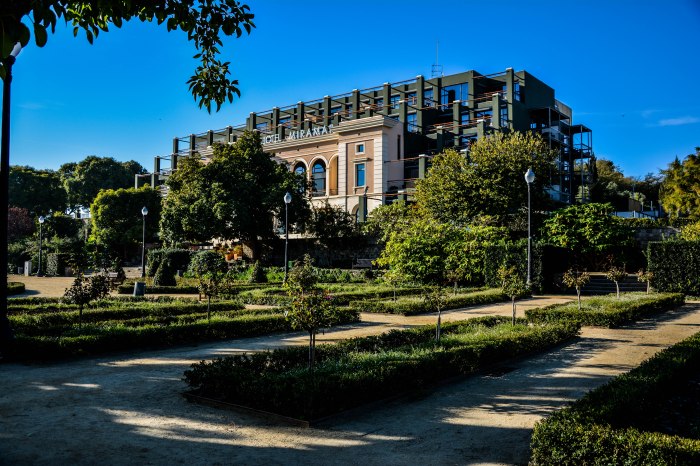
At the top you’ll see a tunnel: here you should bear right before the road disappears through the tunnel. You’ll run past the Restaurant Martinez on your right and into the plaza in which the Hotel Miramar is set.

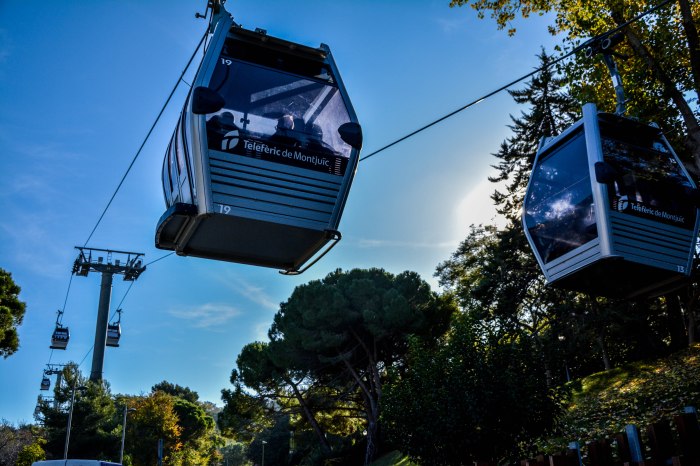
At this point your legs will get some brief respite from climbing as the ground levels out as you cross the square in front of the Miramar. To your right you have a great vantage point from which to survey the harbour. The plaza serves as the destination for the cable car which runs to and from Barceloneta beach. While it’s possible to catch a cable car to the top of Montjuic, this is actually a totally separate system to the one that stops here. There’s no way to catch a cable car from the beach all the way to the top – and there’s a fair distance between the two cable car systems.

To your left is the restored 5 Star Hotel Miramar which preserves the facade of the 1929 palace which was built on Montjuic as part of the International Exposition of the same year. The hotel combines the historic facade with some pretty nifty modern architecture. It’s also a great location to sit and have a coffee in style while enjoying the views over the city. But that’s for another day – we’ve got more climbing to do…!

DSC_0137
Flat Chance: enjoy some brief respite from the climb as the ground levels out in front of the  Hotel Miramar

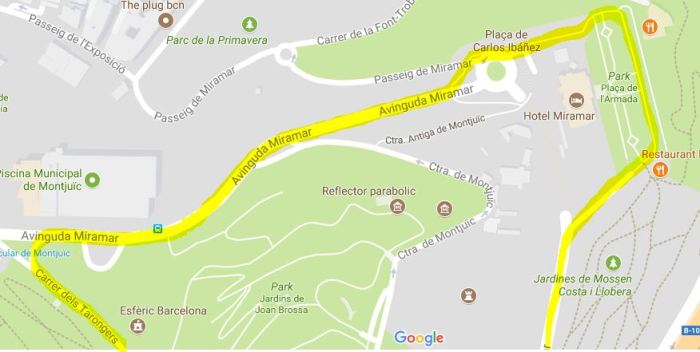
Run around the perimeter of the square and turn left as the gradient picks up again into a gentle incline. To your right, you’ll have views overlooking the Poble-Sec district to the north. Keep running along the paved area and after a few metres you’ll get see a road coming uphill towards you. Cross over at the crossing and follow the Avinguda Miramar as the gradient picks up again. While we’ve included plenty of maps in this blog post, the golden rule is: if in doubt, choose the path that heads uphill…

At the top of the Avinguda Miramar you’ll reach the Montjuic Municipal Swimming Pool, another of the sites built for the 1929 International Exposition, but probably better known for hosting the Olympic diving and water polo in 1992. Surrounded by rows and rows of seating, the pool is now a little rundown from its Olympic heyday, but you can pay to swim here for the bargain price of €6.50 for the day and pretend you’re going for Olympic glory as you paddle around gently (or is that just me?). ‘Amazing’ is an overused word, but the views from the pool are out of this world and amazing certainly fits the bill in this case. For the meantime, however, you’ll have to take our word for it because, from the road along which you’ll be running, the views are fenced off.

Avinguda Miramar

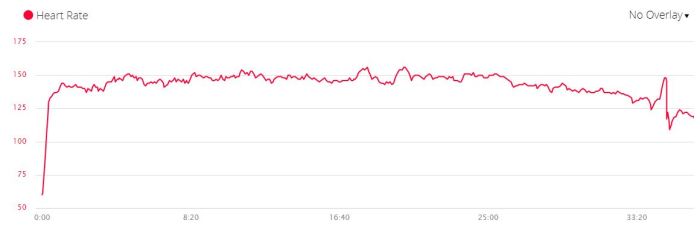
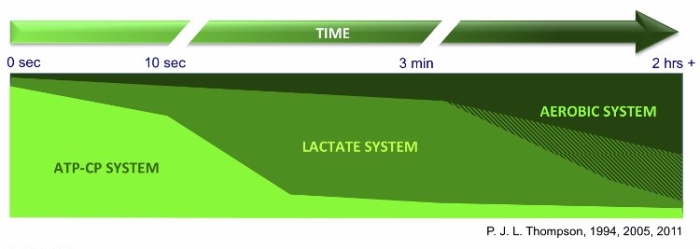
Once you’ve passed the Municipal Pool on your right, you’ll see the Funicular Railway up ahead which ferries passengers up from the Paral·lel Metro Station and links to the second of Montjuic’s two cable car systems. By this point, you’ll be almost half way up the hill and you’ll have hit the 80m (262ft) mark. Your heart should also be pumping pretty hard by now and the lactate will be starting to build up in your legs but, like we said earlier, if it was easy it wouldn’t be as much fun, right?

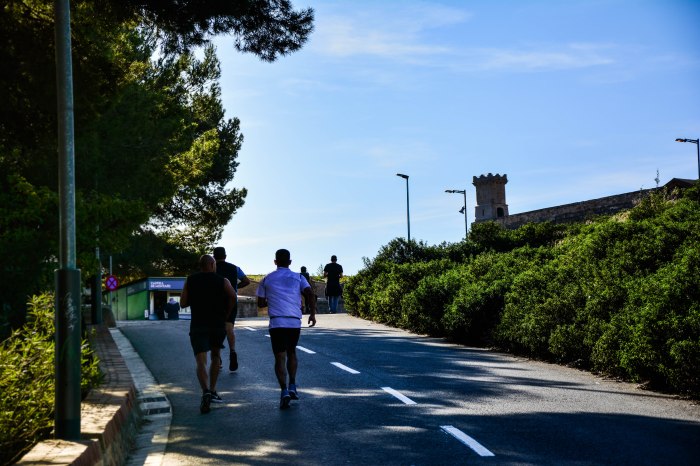
Before you get to the Funicular Railway, turn left and up the hill, passing underneath the cable cars as they cruise on up towards the summit. You might want to tell yourself that, while riding the cable car might be a hell of a lot easier, you’re at least saving yourself a few euros and getting yourself a great workout to boot.

DSC_0169
The easy way up: cable car from the Funicular Railway to the castle

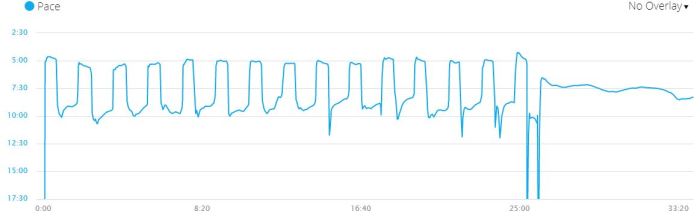
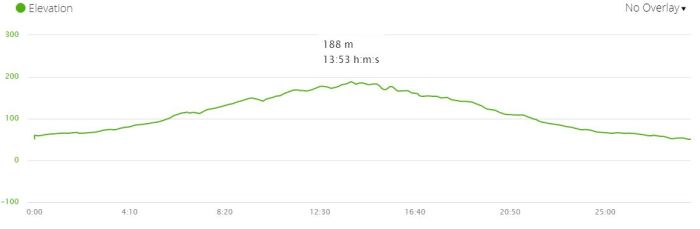
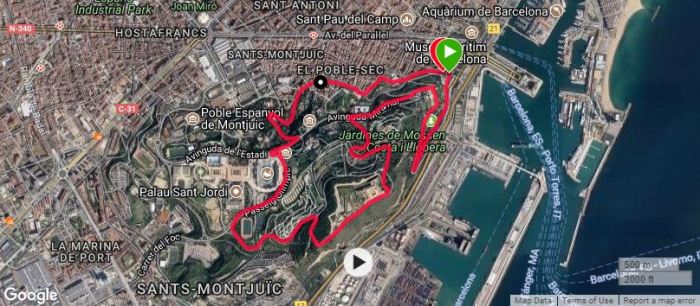
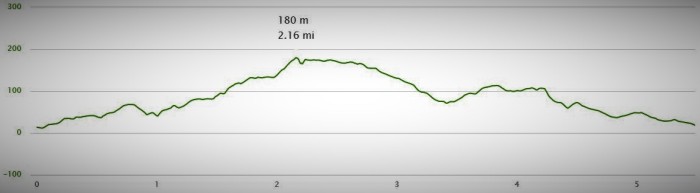
From here, just keep climbing. The incline gets a little steeper as the road winds around to the right and the final push to the castle underneath the cable car lines is probably the steepest part of the climb. They’re are a few different paths you could take to the top but just keeping going upwards and you’ll hit the castle one way or another. And when you do, you’ll have climbed to about 180m (600ft approx.) as the course profile we clocked shows:

Montjuic profile
Our Monjuic Loop course profile

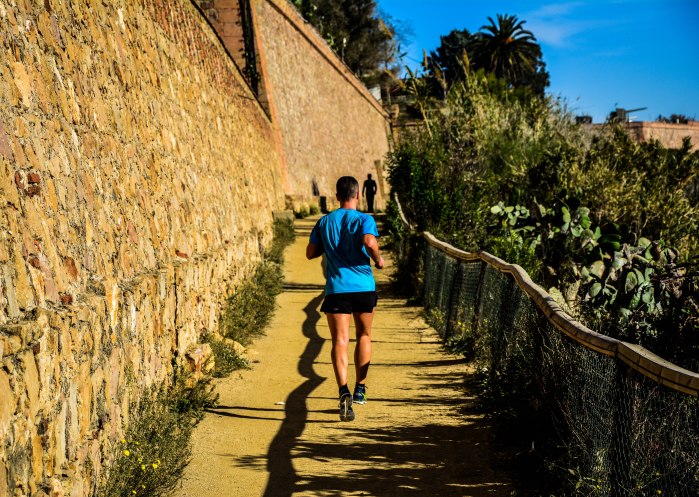
At the top, you’re rewarded with some fantastic views down over Barcelona’s busy shipping port. From way up high, the multi-coloured shipping containers look a bit like Lego bricks as they shine in the sun. Run past the main entrance to the castle on your right and you’ll see a few large gun emplacements. A few steps lead down to a gravel path that skirts along between the castle’s perimeter and Montjuic’s steep south-eastern side. Turn to your right and head along the trail that runs in the shadow of the castle’s walls. Keep heading along the path going straight on until it widens up into a more open area that meets the road and hit the tarmac again.

DSC_0227
Trail round the perimeter of Castell de Montjuic

Keep following the road down hill bearing to your left. Most of the hard work has been done by this stage and your legs, heart and lungs can take it easy as you wind your way back down the mountain. We say ‘most’ of the hard work because eventually you reach a junction where you’ll need to turn right and head back up hill for a few minutes. Take the road that runs alongside the Olympic Stadium to your left as the route starts to run back down hill again and then take a right at the next junction onto Avinguda de l’Estadi.

Olympic

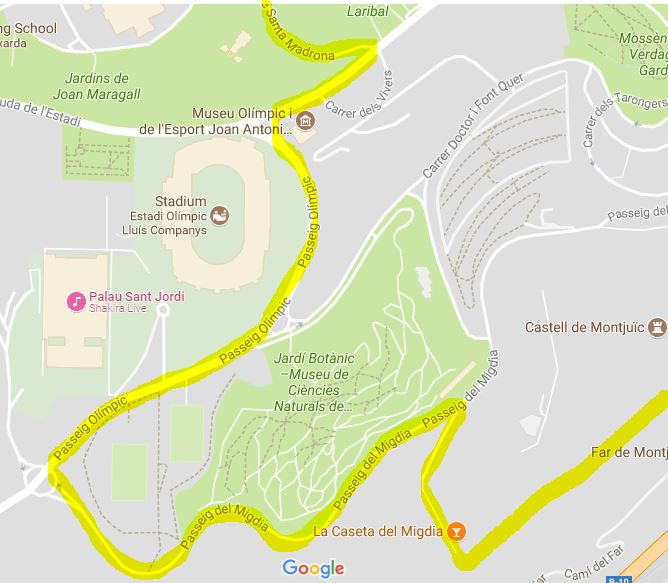
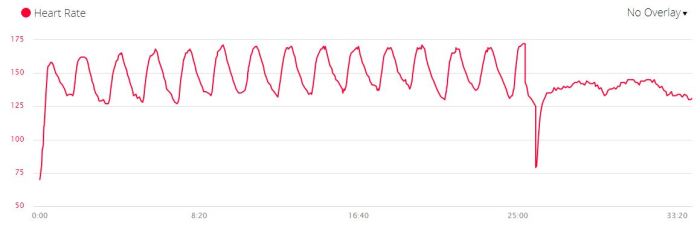
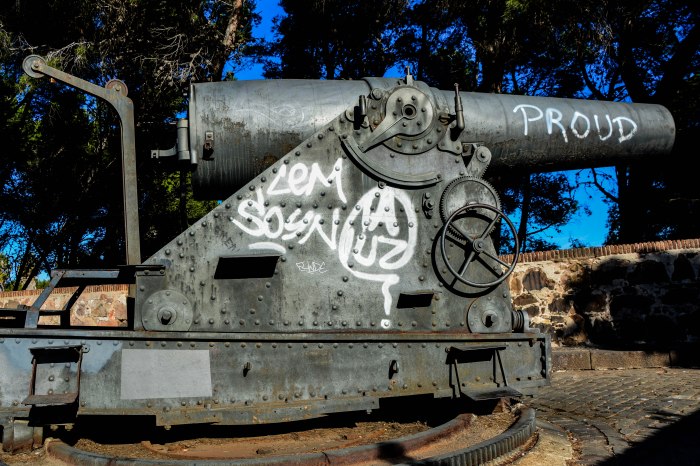
Hook a left down onto Passeig de Santa Madrona and then take your first right onto Passeig de l’Exposicio. Keep following the road as it hugs the side of Montjuic and eventually you’ll arrive back at the fire station where you started. You’ll have 5.5 miles (almost 9km) on the clock and you’ll have had a great workout. All in all, we clocked the total elevation gain at a cool 237 metres (777 feet), the vast majority of that recorded in the first half of the course. And much like the graffiti daubed on the side of one of the old gun batteries, we think that after all that climbing you’ll have good reason to feel ‘PROUD’ of yourselves:

DSC_0201
Reach the top without stopping and you can justifiably feel proud

Check out the rest of our snaps and let us know what you think of the route by leaving us a reply below.

Need help with your training? Book a training session with Run Barca.


Need for Speed: Sharpen up your Pace with Interval Training

Ever feel like your running is stagnating? In the past, as long as you put in the training miles, your personal bests used to tumble regularly. Now, despite your best efforts, your times have levelled-off and you’re simply not seeing the steady improvements you used to. You’re training just as hard as before, sticking to your tried and tested formula, but somehow you’re just not getting any better.

What’s going on? The most likely answer is best summed up in the words of Peter Coe, father and coach of former 800m, 1500m and 1 mile world record holder Sebastian Coe, who said:

Runners who train the same, stay the same.”

– Peter Coe

In training for distance running, no truer words have been uttered. Chances are, by sticking to your same old training regimen, you’ve reached what is known as a training plateau. When you first take up running, your body can experience some pretty profound physiological changes as it struggles to deal with the extra load that your new hobby is putting on it. In a relatively short time, you notice that your times improve dramatically, your endurance increases, those extra pounds you’ve been carrying for a while disappear, helping you to fly along even faster. Your legs tone up and get stronger too. All great news!

But soon that steep improvement starts to flatten out. This is your body getting used to the increased demands being placed upon it. It’s your body’s way of saying ‘no problem, we got this’. A key concept of running training, however, is that of progressive overload. In order to avoid a plateau, you need to keeping piling extra pressure on your body (albeit incrementally) so it can never say ‘no problem, I’m used to this’. If you don’t keep adding pressure – in a controlled way – you’ll plateau. Simple.

So what should you do? Well, plateauing is a sure sign that you should change up your training programme and give your body a bit more to chew on. Now, every training plan, when stripped to basics, will incorporate three elements: frequency (how often you run), intensity (how hard you run), and duration (how long you run for). You can change your training plan by upping the ante in any one of these areas.

DSC_0524.jpg
Increasing the intensity of your workouts by incorporating interval training

This article in particular focuses on increasing intensity (the others are pretty much self-explanatory – either run more often or run further!). One great way of adding intensity to a training programme is through including one day of interval training per week into your training instead of one of your ‘regular’ runs.

The premise is simple: split up your runs into periods where you are running at a hard pace followed by a period of recovery during which you jog slowly or even walk. Other than that, there are no single hard and fast rules – but we’ll walk you through three suggested basic interval sessions.

Benefits of Interval Training

First, though, why should you do intervals? Well, here are just a few of the benefits:

Increased Pace – The most obvious benefit is that they make you run faster. It’s a bit of a truism but if you want to run faster, you have to run faster. The faster-than-normal bursts of speed integral to interval training get your legs used to turning over faster, your heart pumping at a higher rate, and overall they acclimatise your body to running at a higher pace. By putting in sets of faster than race pace repeats, come race day your body will be equipped to handle your target pace because it has been used to running at a higher pace.

Improved Running Form and Economy – Studies show that the most efficient runners run with a higher than average cadence (i.e. the number of steps taken per minute) and an often-cited target cadence is 180 steps per minute or more. Running at a faster than usual pace will naturally increase your cadence – although it will also increase your stride length, which can cause problems if you tend towards over-striding and heel-striking. But making a conscious effort to focus on stride frequency rather than stride length as you run faster can help you become a more efficient runner.

Increased fat-burning – Working out for 30 minutes of high intensity activity interspersed with periods of rest or low intensity exercise have been shown to burn more calories than 30 minutes of moderate exercise. Not only do intense intervals with a high training stimulus beat running at a slower, more comfortable pace when it comes to fat burning, but the extra effort you put in during the harder-paced intervals mean that your muscles require a lot more energy post-workout in order to recover. This is known as the ‘after-burn effect’ in which your body continues burning calories after you have finished running.

DSC_0488
Build interval training into your routine to sharpen up and stay ahead of the pack
Three Interval Workouts to Try

Here we suggest three broad interval workouts to try and build into your routine. As a general rule, if you’re training for / trying to improve your 5k time, you will be looking at running shorter, quicker intervals. Conversely, if you’re in marathon or half marathon training mode, then the longer but slower type interval sessions are for you. If you’re trying to beat your 10k personal best, then try the one in the middle.

Back in the day before GPS watches, the ideal place to run intervals was on a 400m track because of the ease of measuring and timing your intervals. In the age of Garmin and Strava, however, finding a local running track is no longer necessary. Try to pick somewhere relatively flat where you can run uninterrupted by traffic and other inconveniences (in Barcelona, the beachfront is probably your best bet).

Short and quick 400m repeats 

Try building one interval session into your training per week over a period of 4 weeks where, after a gentle warm up, you run quarter miles (400m or a single lap of a standard track) repeats at your 5k pace or slightly quicker. In between your fast quarter miles, run the same distance at a gentle jog as recovery. If you are new to intervals, start off with between 4 and 6 sets in the first week, adding two additional sets per week until by the end of 4 weeks you’re running 10 to 12 sets.

With interval training, the goal is to aim for consistency. Try to hit your target pace on each interval. If you find yourself slowing towards the end of your sets, this is probably a sign that you were pushing too hard in the early stages, causing you to run out of puff later on. Ideally, you should be hitting more or less the same splits with each interval (aim for all your splits to be within, say, 5 seconds of each other). If not, adjust for your next session.

Half Mile Tempo Intervals

A great option if you’re training for a 10k. After your warm up, try running 6 to 10 intervals of a half mile (800m approx. or two laps of the track) at your 10k pace or quicker. For a recovery period, try a half mile light jog in between but if you feel fit and strong, you could taper this back to a quarter mile or less.

Again, because you are aiming for consistent splits, it is better to err on the side of caution when it comes to the recovery period – especially when first picking up interval training – because you really don’t want to blow out two sets before you reach your target number of sets.

One Mile Repeats

As the name suggests, you’ll be running whole mile (1600m or 4 laps of the track) intervals here. For your interval pacing, you can either try using your 10K pace or, alternatively, knock around 30 seconds off your half marathon race pace. Aim to do 4 to 6 mile repeats. As with all interval training, the goal is to keep your times consistent so aim to keep each hard-paced mile within no more than five seconds of the others.

For recovery time, start off by halving your goal time for the mile intervals (so, for example, if you’re running 7 minute miles, this would be 3 minutes 30 seconds of recovery). As you get used to running intervals and you find you can hit your mile target splits evenly and consistently, you could taper back the recovery time to 2 minutes. Alternatively (or additionally), you could try dropping your mile target pace by 15 seconds.

Interval training in pictures

We’d emphasise that the above suggested workouts are just that – suggestions – and that interval training comes in all shapes and sizes and can be adapted to suit the individual runner’s needs, fitness or training goal. However you formulate your workout, though, the golden rule is to achieve consistency in your splits. Take a look at this example of what a good, even sets of splits looks like (this is a 15 x 200m interval workout with warm down).

Interval pacing
Solid, even 200m splits at 5 min mile pace with 10 min mile pace recovery

Notice, too, the effect on heart-rate and how it tracks the intervals almost exactly:

Interval heartrate
Heart-rate during 200m interval training

Compare a similar length workout run by the same runner at an even pace:

Steady pace heartrate
Heart-rate during even-paced workout

So give intervals a go. And remember, don’t rest on your laurels – once you find you can handle a training regime with ease, that’s a sign that you are going to need to change it up or you’ll be back on the plateau…

Tell us what you think in the comments below!

Need help with your training? Book a training session with Run Barca.

Get your hill training in by taking a trip to Park Güell


  • Run type: hilly, mixed surface (paved and gravel) out and back
  • Location: Park Güell / Gracia
  • Distance: short (less than 4 miles / 6.5km)
  • Starting point: Avinguda Diagonal near Verdeguer Metro

Last up in Run Barca’s guide to the best running routes the city has to offer, we hit the beachfront for a medium distance, flat-as-a-pancake dash along the Passeig Maritim. This time we have something a little different – a course guaranteed to get your calves burning as we climb about 135m (442 feet) in less than 2 miles on our way up to Gaudi’s spectacular modernist public space, Park Güell.

Park Guell zoom out
Full Route Map

Speedwork in Disguise

Park Guell Elevation
Check out the very healthy elevation profile we clocked


The Route

So let’s get going! The starting point for this run is a stretch of semi-parkland that runs between the Passeig de Sant Joan, just north of Avinguda Diagonal near Verdeguer Metro station.

Verdeguer
Starting Point


Keep going until you reach the top of the stretch of semi-parkland, cross the road at the top, head left briefly and then take the first right onto the Carrer del Torrent de les Flors. This is a long, steadily inclining road which stretches up past the centre of Gracia to the west, criss-crossed by relatively quiet streets (again, take care), until it reaches the busy main road Travessera de Dalt to the north.

Dalt


Crossover and turn left along Dalt before taking the first right onto Av. del Santuari de Sant Josep de la Muntanya. The real climb up to Park Güell kicks off here as the road curves up steeply. You’ll go past a hospital on your right and a walled park and the grandiosely-named Church of the Nuestra Señora de los Desamparados en Sant José de la Montaña on your left.


Winding streets

Keep following the road upwards as it winds left, right, and left again, climbing steeply up the hillside through residential streets. As long as you keep going upwards, you can’t take a wrong turn until eventually you will reach Av. del Coll del Portell. Here you will see Park Güell’s wall on your right. At the top, you’ll run out of road but carry on running onto the gravel path on the right-hand side and keep bearing right and you’ll enter the Park on its north side.


Here you have two choices. EITHER you can chill out for a while, catch your breath, and check out the sights around Gaudi’s magnificent municipal space (we’d recommend checking out a sunset and seeing Barcelona bathed in orange and pink light from high above the city). OR you can push on through. Either way, by this stage you will have got less than 2 miles (3km) on the clock but the climb alone will be enough to have got your heart pumping and your legs burning. If you choose to push on, take a left from the place where you entered the park and run up a slight incline past a large pastel-yellow villa named ‘Salve’.


DSC_0009
Salve, Park Güell

By now, you’ve done all the hard work and all you have to do is wind your way down through the stylist park, running over its idyllic elevated walkways, marvelling at Gaudi’s organically-inspired creations as you go. You’ll emerge at the park’s southernmost entrance. Take your second left once you’re through the gate downhill onto Carrer de Larrard. Here you run down a straight road until you’re back at Travessera de Dalt. Cross over the road, turn right and follow Dalt until you arrive at the top of Carrer del Torrent de les Flors on the left after a couple of metres and make your way back to where you started.


Park Guell
Slalom your way down through the park over Gaudi’s elevated walkways

All in all, we clocked this route at 3.8 miles or just over 6km. It’s by no means a long run but the steep hill climb is invaluable. Adding a climb like this to your weekly routine will reap you real training benefits: namely, increased speed and endurance when on the flat. Climbing hills also builds leg strength by developing the muscles in your thighs, calves and glutes (we’re talking seriously strong buttocks here!) and burns more calories per mile than the same distance done on the flat. Even the run back downhill, while feeling relatively easy, works the lower abs and your quads (although you should take smaller steps to reduce impact when running downhill and be careful not to heel strike).

Alternative Routes

While our suggested route takes the most direct course up Carrer del Torrent de les Flors, you may wish instead to run up through the pleasant centre of Gracia, turning right and left through its grid-like streets before you reach Travessera de Dalt. This will serve to break up the first part of the climb as the streets which run east to west are relatively flat so you’ll only be running uphill when heading north. Once you reach Dalt, you can pick up the rest of the suggested route.

DSC_0001
Church in Placa de la Virreina, Gràcia: Parròquia de Sant Joan Baptista de Gràcia

Hill Sprints

For those of you who can’t get enough of hill training, you’ll notice plenty of great spots to do a few repeat hill sprints along the way to Park Güell (or even in the park itself). Undoubtedly one of the best exercises you can do to build leg strength and speed, try picking a decent length stretch of hill, as steep as you can manage, for a set of hill sprints. Run 6 to 8 reps of 10 seconds each, sprinting as fast as you can up hill, and walking back down slowly (try and leave at least 60 seconds between sprints). Again, throw some hill repeats into your routine and you’ll be amazed at how your pace begins to improve as the weeks go by.

And if you’re putting in the hard work whilst surrounded by the magical Park Güell, looking down over one of the most beautiful and culturally rich cities in the world, then it can’t be that bad, can it?

Need help with your training? Book a training session with Run Barca.

Check out some of our snaps taken along the route and tell us what you think in the comments:

Powering your run: some science to chew on

Runner

Training for distance running. It’s all about long, slow runs and clocking up the weekly mileage – the more the better, right?

Well, not quite. True, while a healthy weekly mileage tally may form the base of your training regime when preparing for a marathon or half marathon, it’s important to build upon the solid foundations of those long miles with some more intensive sessions – strides, intervals, fartleks, set repeats or other exercises that broadly fall under the banner of ‘speed work’. This is particularly so if you are preparing for a 5k or 10k.

But if even if you are training for a half marathon, marathon or beyond, there are good reasons why you will want to build speed work into your weekly training – and these reasons are grounded in physiology and the way your body is powered.

Energy systems used in running: Aerobic, Lactate and ATP-CP systems

Energy is stored in the body in various forms of carbohydrates, fats, proteins and creatine phosphate. Meanwhile, adenosine triphospate – or ATP – is the body’s usable form of energy. The body utilises three different energy systems to turn that stored energy into usable ATP to power our muscles whilst running.

Understanding which of these three energy systems the body is primarily using during your runs will help you to train in a way that targets and improves those specific systems.

So what are the three energy systems?

Aerobic

The first and most important for distance running is the aerobic system. This system uses carbohydrates, fats, or proteins to produce energy and requires there to be enough oxygen available for the working muscles (hence the name). Energy production is slower but more efficient than the other two systems and is utilised in longer term, lower intensity activity. So that long, slow Sunday morning run you do every week? That’s being powered primarily by your aerobic system.

Lactate/anaerobic system

Next there is the lactate or anaerobic system. Unlike the aerobic system, the lactate/anaerobic system doesn’t require oxygen to produce energy. Instead, the body uses stored glucose to produce ATP to power your muscles in conditions when adequate oxygen isn’t available for aerobic metabolism. The anaerobic system is used during short-term periods of intense exercise and can power you for 1 to 3 minutes max. Your kick at the end of a 5k when you’re sprinting for the line? You’re primarily using your anaerobic system right there.

ATP-CP system

Finally, there is the ATP-CP system. This is the quickest form of energy production but can only supply enough energy for a short burst of intense activity like a 5 second sprint.  It’s used when the body experiences a sudden increase in energy demand – for example, when you’re starting up your run or when you’re training explosive hill repeats. This system relies on the availability of creatine phosphate which depletes quickly. Once the body’s limited stores of creatine phosphate are used up, the body must call on either the aerobic or anaerobic/lactate energy systems to sustain continued activity.

Take a look at the diagram below and you’ll see that the three energy systems are not mutually exclusive, but are inter-dependent. As a rule, however, your longer low-intensity runs will be relying more heavily on the aerobic systems whilst your more intense sessions like sprints, intervals and set repeats are going to be predominantly working the lactate/anaerobic or ATP-CP systems.


Energy systems

Smarter training – the fartlek

So, having had a quick crash course in energy systems and metabolism, what does this mean for how we should train? Should we just keep aiming for a high weekly mileage or can we cut some of those long miles and train smarter?

There is probably no wrong or right answer but an interesting case study in training habits can be found by looking at Seb Coe and Steve Ovett’s respective training regimes. Both were elite middle distance runners – and fierce rivals – but they trained in very different ways. At his peak, Ovett was reportedly running an incredible 140 miles per week. Coe, meanwhile, was barely clocking 40, preferring to focus on intense speed work. While it is impossible to say which approach produces the best results, one thing is clear: if you don’t have the time to put in the high mileage weeks, you can get more bang for your buck by running fewer but more intense miles. And if you want to train in a way that hits all three of your body’s energy systems, then look no further than the fartlek.

Fartlek is a Swedish term that literally means “speed play”. It was developed by Gösta Holmér who experimented with the idea of playing with speed when training Swedish athletes to try and break the dominance of rival Finnish distance runners in the 1930s.

Stopwatch.jpg
Fartlek training can improve your pace substantially

In short, a fartlek session consists simply of periods of fast running and sprints mixed in with periods of slower running and jogging. Starting with this basic principle, fartleks  can be adapted and tailored for a variety of training needs, running abilities, and fitness levels. And the best thing, by constantly mixing up your pace, going from sprints to jogs to hard paces, you’ll be hitting each of your aerobic, lactate and ATP-CP systems during the same session.

Next time you go out on your regular running route, instead of running at a steady even pace, try alternating between a jog, a fast run and a sprint across the duration of the run. You can use regular landmarks – say, lamp-posts or trees, park benches, whatever you want. Try and keep up the pattern for as long as possible but if you start to feel the pace a little you can always throw in an extra bit of jogging  – maybe jog for two street lamps’ distance instead of one or follow a jog-run-jog-sprint-jog pattern.

Replacing a regular short to medium length (3 to 5 miles) run once per week will help you avoid a training plateau, tune up your speed / race kick and get you much fitter per total minutes spent running than a standard comfortable paced run. And the more you do fartleks, the more you’ll notice your pace getting quicker as your body gets used to running at higher intensity levels.

But don’t just take my word for it – give it a go yourself and tell us what you think!

Need help with your training? Book a training session with Run Barca.

Barcelona: is this the best running city in the world?

Barcelona is one of the most popular tourist destinations in the world, with visitors flocking to the Catalan capital to experience the city’s unique cultural, artistic and architectural heritage. Throw in great tapas, a lively night-life, the glorious city beach, perfect climate, and probably the best domestic team in world football and it’s not hard to see why an incredible 18 million international visitors were estimated to have made the trip to Barcelona in 2016 alone.

Barcelona, however, is also a running enthusiast’s dream with a mixture of terrains and run-types for the distance runner to get their teeth into and plenty of spectacular sights and scenery to take in along the way.

Over the course of the next few weeks, this blog will be tracking some of the city’s ‘must runs’ with suggested routes, maps, photographs and sights to look out for. So what are you waiting for? Get out there!

W Hotel to Poblenou Skate Park and back

DSC_0144
Beachfront and W Hotel
  • Run type: flat, paved, out-and-back
  • Location: beachfront
  • Distance: medium (5 miles / 8km)
  • Starting point: W Hotel

To kick things off, we’ll start with a middle distance route along Barcelona’s iconic waterfront – probably the most popular spot for the city’s many runners. We clocked this run at pretty much 5 miles (or just over 8km) dead and the route is almost completely flat so this is a great run for people wanting to keep their mileage ticking over midweek. In addition, because of its flat trajectory and lack of roads to cross / other interruptions, it’s a perfect route for running those intervals, strides or fartleks to hone your speed.

W to Poblenou

The starting point we chose is the striking W Hotel (known locally as the Vela or ‘Sail’ Hotel) located at the far end of the Passeig Maritim – although you could pick any spot along the route as your start and finish point. From the W Hotel, you will run in a north-easterly direction up along the coast, passing a host of beachfront bars and cafes (remember these for your post-run refreshments!).

After about a mile-and-a-half, you’ll go over a small hump-backed bridge and pass the Barcelona Casino on your left and the Port Olimpic marina on your right. After the marina you can either go down a ramp to the right and run tight to the beach or take a slightly more elevated route to the left – your choice but either way it’s virtually impossible to take a wrong turn: just keep following the path. Handily, there are plenty of water fountains along the way to keep you hydrated.

After about 2.5 miles, you reach the skate park at Poblenou which is a natural turning point to loop round and head back the way you came until you’re back at the W. Next stop: one of those beachfront cafe bars we mentioned earlier for your well-earned reward…

Turning point, skate park
Turning point at Poblenou

As any schoolkid will tell you, the sun rises in the east and sets in the west. That being so, this route makes a great dawn run as you can watch the sun coming up out to sea as you run along the east-facing shoreline. Check out the photos we snapped along the course and tell us what you think!

Need help with your training? Book a training session with Run Barca.

DSC_0056
Dawn runner on the Marina wall
DSC_0100
Early morning at Poblenou
DSC_0074
Morning Workout
DSC_0102
Poblenou Skate Park